ArchOne AI is an all-in-one AI spatial design visualization platform for early-stage workflows across architecture, interiors, exteriors, and landscapes. Create, compare, and refine connected design directions with ArchOne AI Agent on one infinite canvas.
Learning how to design a kitchen starts with understanding how the room must work. Write down your routines, measure the existing space, and list the exact appliance requirements. Compare layouts, open every door and drawer on the plan, organize storage around tasks, and choose materials and lighting. Lock the appliance models before the final cabinet drawings, then visualize the design. Before you order, ask the responsible designer, supplier, or contractor to confirm the dimensions, utilities, and product requirements.
Following this order helps you catch costly conflicts before you approve the cabinets. An island that blocks the dishwasher will frustrate you regardless of how good it looks. A pantry adds little value when everyday items remain hard to reach.
Kitchen planning figures can change as codes and standards are updated. Before ordering, check local codes and the latest instructions for each product. This guide refers to the current , applicable , EPA guidance, and manufacturer documents. Figures from an earlier public NKBA edition are labeled where they appear.
For one normal week, note each repeated problem. Do this in the current kitchen, even if the new one will be in a different room.
Moment
What happened
Likely design response
Breakfast
Two people reached for the fridge and blocked each other
Keep the fridge near the room edge, outside the main prep zone
Food prep
Chopping space filled with small appliances
Add appliance storage or a dedicated appliance zone
Cleanup
Open dishwasher blocked the dish drawer
Move the drawer or change the loading sequence
Groceries
Bags traveled across the full room
Create a short route from entry to fridge and pantry
Waste
Bin was behind the person cooking
Place waste near prep and cleanup, without blocking either
Record how often each problem occurs, not just how frustrating it feels. A problem that happens three times a day deserves more attention than one that appears twice a year.
Adults, children, guests, pets, and anyone with mobility or reach needs
Cooking
One cook or several, meal types, batch cooking, baking, and entertaining
Eating
Number of daily and occasional seats
Storage
Food, cookware, small appliances, recycling, cleaning supplies, and bulk items
Must keep
Appliances, flooring, cabinets, windows, doors, or views
Main problems
The three daily issues the new kitchen must solve
Future needs
Aging in place, children growing, remote work, or appliance replacement
Set three priorities. For example: space for two people to cook without blocking each other, easy cleanup, and a place to hide everyday appliances. When choices conflict, these priorities help you decide.
Counter height, reach, grip, sight, and turning space do not suit everyone in the same way. Talk to the people who will use the room. Test important heights rather than assuming a standard arrangement will feel comfortable.
The recommends a seated work surface, , and clear color contrast. It also recommends cushioned, slip-resistant mats where they help. These features can make a kitchen easier to use even when the project does not follow a formal accessibility standard.
For projects covered by the ADA Standards, Section 804.2 sets minimum clearances for two kitchen types. A pass-through kitchen with two entries needs at least 40 inches between opposing elements. A U-shaped kitchen enclosed on three connected sides needs at least 60 inches. Measure between the cabinet, countertop, appliance, or wall surfaces that extend farthest into the aisle; exclude hardware. Section 804.2 exempts some spaces without a cooktop or conventional range. The ADA Standards generally cover state and local government facilities, public accommodations, and commercial facilities rather than most private single-family homes. Check the full and confirm which requirements apply to the project.
For this guide, classify the project as a refresh, a partial remodel, or a full redesign:
A refresh keeps the layout and most fixed elements. It may change paint, hardware, lighting, backsplash, or selected appliances.
A partial remodel may replace cabinets and appliances but keep major plumbing, walls, and openings.
A full redesign may move utilities, alter openings, or change the relationship with nearby rooms.
Write two lists: what must stay and what may move. Include windows, doors, walls, plumbing, gas, electrical service, ventilation routes, flooring, and major appliances.
Moving a sink, range, or wall can affect far more than the layout. It may change drainage, wiring, ventilation, structure, permits, finishes, and schedule. Ask for professional advice early, before assuming a major change fits the budget.
Start with the work that makes the room safe and functional. Then choose the finishes and final look.
Survey, design, engineering, and permits where needed
Demolition, structure, plumbing, electrical, gas, and ventilation
Cabinets, appliances, countertops, and installation
Lighting, flooring, backsplash, paint, hardware, and trim
Extra budget for hidden problems and approved changes
Do not spend the full budget on visible finishes. An outdated electrical panel, damaged subfloor, or unsuitable duct route may only become clear after work starts.
Measure from one consistent reference point. Record:
Each wall length and the ceiling height
Door and window widths, heights, and positions from corners
Door swings and the space needed for handles
Window sill height and the height of the top of each window
Columns, beams, ceiling drops, radiators, vents, and sloped ceilings
Water, drains, gas, outlets, switches, and electrical panel capacity
Existing cabinet, countertop, and appliance dimensions
Floor level changes and walls that are not square
Measure corner-to-corner diagonals where possible to find walls that are not square. Measure critical dimensions twice. Label every number as either verified, to be checked, or assumed. Resolve every assumption before ordering.
Measure the room itself, not only the existing cabinets. Record openings, utilities, and anything that limits the new layout.
“36-inch fridge” is not enough information. Two products with the same nominal width may need different openings, door clearances, ventilation, electrical connections, or water locations.
Build an appliance schedule:
Appliance
Manufacturer and model
Product size
Required opening
Door or drawer movement
Utility and ventilation
Source checked
Refrigerator
To select
—
—
Hinge side and full door swing
Outlet and water if used
Spec sheet + install guide
Range or cooktop
To select
—
—
Oven door and nearby handles
Power or gas; hood route
Spec sheet + install guide
Dishwasher
To select
—
—
Open door and loading position
Water, waste, and power
Spec sheet + install guide
Use the current manufacturer documents for the exact model. The , for example, provides separate product specifications, installation guides, and other technical files. Wolf also tells designers not to change the required dimensions in its .
Think about future replacement too. An unusual opening size may limit your appliance choices later.
A landing area is the nearby surface where you put groceries, washed food, a hot pan, or a dish from an appliance. Test it with the appliance open and the kitchen in use. A surface shown on the plan may still be unsafe or awkward if a door, seat, or person blocks it.
Appliance or fixture
What to test
Common conflict
Refrigerator
Where groceries and containers are set down while the door is fully open
The nearest surface is across the traffic route or behind the door swing
Sink
Continuous preparation space near the sink and a clear dishwasher-loading path
The counter is split into small pieces or the open dishwasher blocks dish storage
Cooktop or range
A heat-safe landing surface within easy reach on both sides
A tall cabinet, wall, or seat takes up the safe space for hot pans
Oven or microwave
A stable, heat-resistant surface near the open door at a usable height
A hot dish must be carried across an aisle before it can be set down
Dishwasher
A loading position and short route to everyday dish storage
The open door blocks the only route or prevents a storage drawer from opening
Do not use this table as a sizing rule. Confirm exact landing dimensions with current planning guidance, local requirements, and the installation documents for the selected appliances.
If you move the sink, confirm the drain route and floor construction early. If the project involves gas, electrical upgrades, or a new hood route, involve the appropriate licensed professional.
Ventilation is part of the plan, not a late appliance choice. The U.S. Environmental Protection Agency recommends using a range hood whenever you cook and venting it outdoors when possible. It also recommends using back burners when possible and leaving the ventilation on for 10–20 minutes after cooking. See the EPA’s . A high-airflow hood can pull exhaust gases from a gas water heater, furnace, or other back into the home. Ask a qualified professional whether the home needs a way to replace the exhausted air or other safety measures.
For a freestanding range, check and install the specified anti-tip device. The that freestanding ranges and stoves be installed with anti-tip brackets to reduce scalding and crushing risks. Follow the current installation instructions for the exact appliance model.
A one-wall plan can work well in a studio or open room. Group tall storage at one end where possible. Protect useful prep space between the sink and cooking area. Avoid breaking the countertop into many small pieces.
A galley can be highly efficient because the main tasks sit close together. It becomes uncomfortable when it also acts as a corridor. Place frequently used appliances—and those with large doors—so two people can still work safely.
An L-shaped layout can open to a dining or living area and may leave room for a table. Plan the corner carefully. A hard-to-reach corner filled with rarely used items is not automatically useful storage.
A U-shaped plan can provide generous countertop space and storage. It also creates two corners and can feel enclosed. Check the entry width, opposing drawers, and whether one user can leave while another is working.
A peninsula offers countertop space, storage, or seating without requiring clearance on all four sides. It can also become a barrier. Test the opening with people, appliance doors, and dining chairs in use.
An island should have a clear job: preparation, cleanup, cooking, serving, seating, or storage. It does not need to perform all six. Adding a sink or cooktop also raises questions about plumbing or power, ventilation, safety, and cleaning.
The shows these layouts and related material and color ideas. For a tight room, use the more focused to compare one-wall, galley, L-shaped, peninsula, and movable-island options.
The classic work triangle connects the sink, refrigerator, and cooking appliance. It is still a useful quick check. It can reveal a route that is too long or an island that cuts through the path.
It is not a complete design method. A modern kitchen may have several cooks, separate ovens, a pantry wall, coffee equipment, recycling, or a second sink. Task zones often describe how these kitchens actually work more clearly.
Plan these zones:
Food storage
Washing and cleanup
Preparation
Cooking
Serving
Everyday dishes
Waste and recycling
Small appliances, drinks, or baking where relevant
Keep through-traffic away from the main preparation zone where possible. Then test a busy, realistic situation: one person cooking, another unloading the dishwasher, and someone else reaching the fridge.
An earlier public NKBA guideline recommends a work aisle of at least 42 inches for one cook and 48 inches for multiple cooks. Measure this space between counter fronts, tall cabinets, or appliances. That cites the 2015 IRC. NKBA's current reflects the 2024 IRC, but the public page omits its full recommendations. Check the current edition, local requirements, and product instructions before applying the older figures.
These planning recommendations do not replace local code, accessibility requirements, or product instructions. Seating, handles, open appliances, and household traffic may require more room.
Mark the fully open position of every moving part on the drawing or floor:
Refrigerator, freezer, oven, dishwasher, and microwave doors
Cabinet doors, drawers, pull-outs, and waste bins
Room doors and nearby doors
Stools and dining chairs pulled back for use
People standing at the sink, range, counter, and appliance
Test every pair of doors or drawers that might be open at the same time. Can the dishwasher open while someone stands at the sink? Can the fridge door open far enough to remove a shelf? Does a corner drawer hit the adjacent handle? Is there a cabinet filler strip beside the wall so the door can clear the trim?
Test every door, drawer, appliance, and chair in its fully open position. Red marks show conflicts; the dashed line shows the path people need to walk through.
A full-scale mock-up can catch what a small-scale drawing hides. building full-scale cabinet and appliance models from cardboard or 1/2-inch plywood. In one project, a mock-up revealed that the open dishwasher blocked a planned dish-storage drawer. In another project, the team resolved a refrigerator-door and walkway concern by specifying a French-door refrigerator with shallower doors.
The short video below shows this kitchen-planning process. Watch how the team tests real movements and revises the plan before construction.
Three useful lessons:
Test the plan at full scale when possible.
Review appliance doors and storage together, not one item at a time.
Change the plan before cabinets are ordered, not during installation.
Can another person use it while cooking continues?
Baking
Mixer, trays, flour, tools
One cabinet group near a clear surface
Is the heavy mixer easy to lift or slide out?
Entertaining
Serving pieces, glassware, drinks
Near dining or serving route
Can guests reach drinks without entering the work zone?
Wide drawers often make pots, dishes, and food easier to see than deep base cabinets. Tall storage can hold a great deal, but shelves above comfortable reach should contain lighter or less-used items. Special corner fittings can improve access, but they also cost space and money. Compare them with a group of simple drawers or leaving the corner unused.
Open shelves keep items visible. They also expose them to dust and cooking residue. Use them for objects you reach and clean often, not simply as decoration.
Start with cabinet construction, door style, and the main countertop. Then coordinate the backsplash, floor, paint, hardware, and lighting.
Surface
Questions to ask before choosing
Cabinets
Can hinges and drawer hardware be repaired or replaced? Is the finish suitable for heat, moisture, and cleaning?
Countertop
Can it resist stains, heat, and impact? Are the seams, repairs, and daily care acceptable?
Backsplash
Are grout, outlets, corners, and cleaning needs acceptable?
Flooring
Is it comfortable, slip resistant, repairable, and suitable for the adjoining rooms?
Hardware
Is it easy to grip? Will handles collide at corners? Are replacements available?
Order real samples. View them together in the room during the day and at night. A pale cabinet can look green, gray, or yellow beside a particular floor and lamp.
If you prefer a simple, clean-lined design, the shows flat-panel cabinets, subtle contrast, stone, wood, and built-in lighting. Use it for visual reference, not as a measured plan.
Natural light: daylight from windows and adjacent rooms
Ambient light: general illumination for safe movement
Task light: focused light on countertops, sink, cooking, and cleanup areas
Accent light: optional light that reveals texture, shelves, or architectural features
Decorative light: an optional visible fixture that supports the overall design
Avoid relying on recessed lights behind the person standing at the counter. They can cast the user's shadow across the work surface. Under-cabinet lighting can light the work surface directly. Coordinate power supplies, switches, color temperature, and outlet positions before the walls are closed.
Layered lighting combines daylight, general ceiling light, direct light on work surfaces, and optional accent or decorative fixtures.
Once the brief, layout, appliances, and main materials are clear, build a small mood board. Include real product samples, cabinet and countertop references, hardware, lighting, and a few images that show the look you want.
AI kitchen images can help you compare:
Light and dark cabinet options
Warm and cool color and material combinations
Backsplash size and how bold it looks
Pendant styles and lighting mood
Open shelves versus closed storage
A small visual update versus a more complete redesign
They cannot verify measurements, clearances, cabinet engineering, appliance installation, plumbing, ventilation, structure, code, accessibility, cost, or product availability.
Use AI for
Verify elsewhere
Early visual options
Room and cabinet dimensions
Material and color choices
Real samples and product specifications
Lighting mood
Fixture brightness, controls, and electrical design
Client or family discussions
Code, safety, accessibility, and whether the design can be built
Comparing a few concepts
Final drawings, orders, and installation details
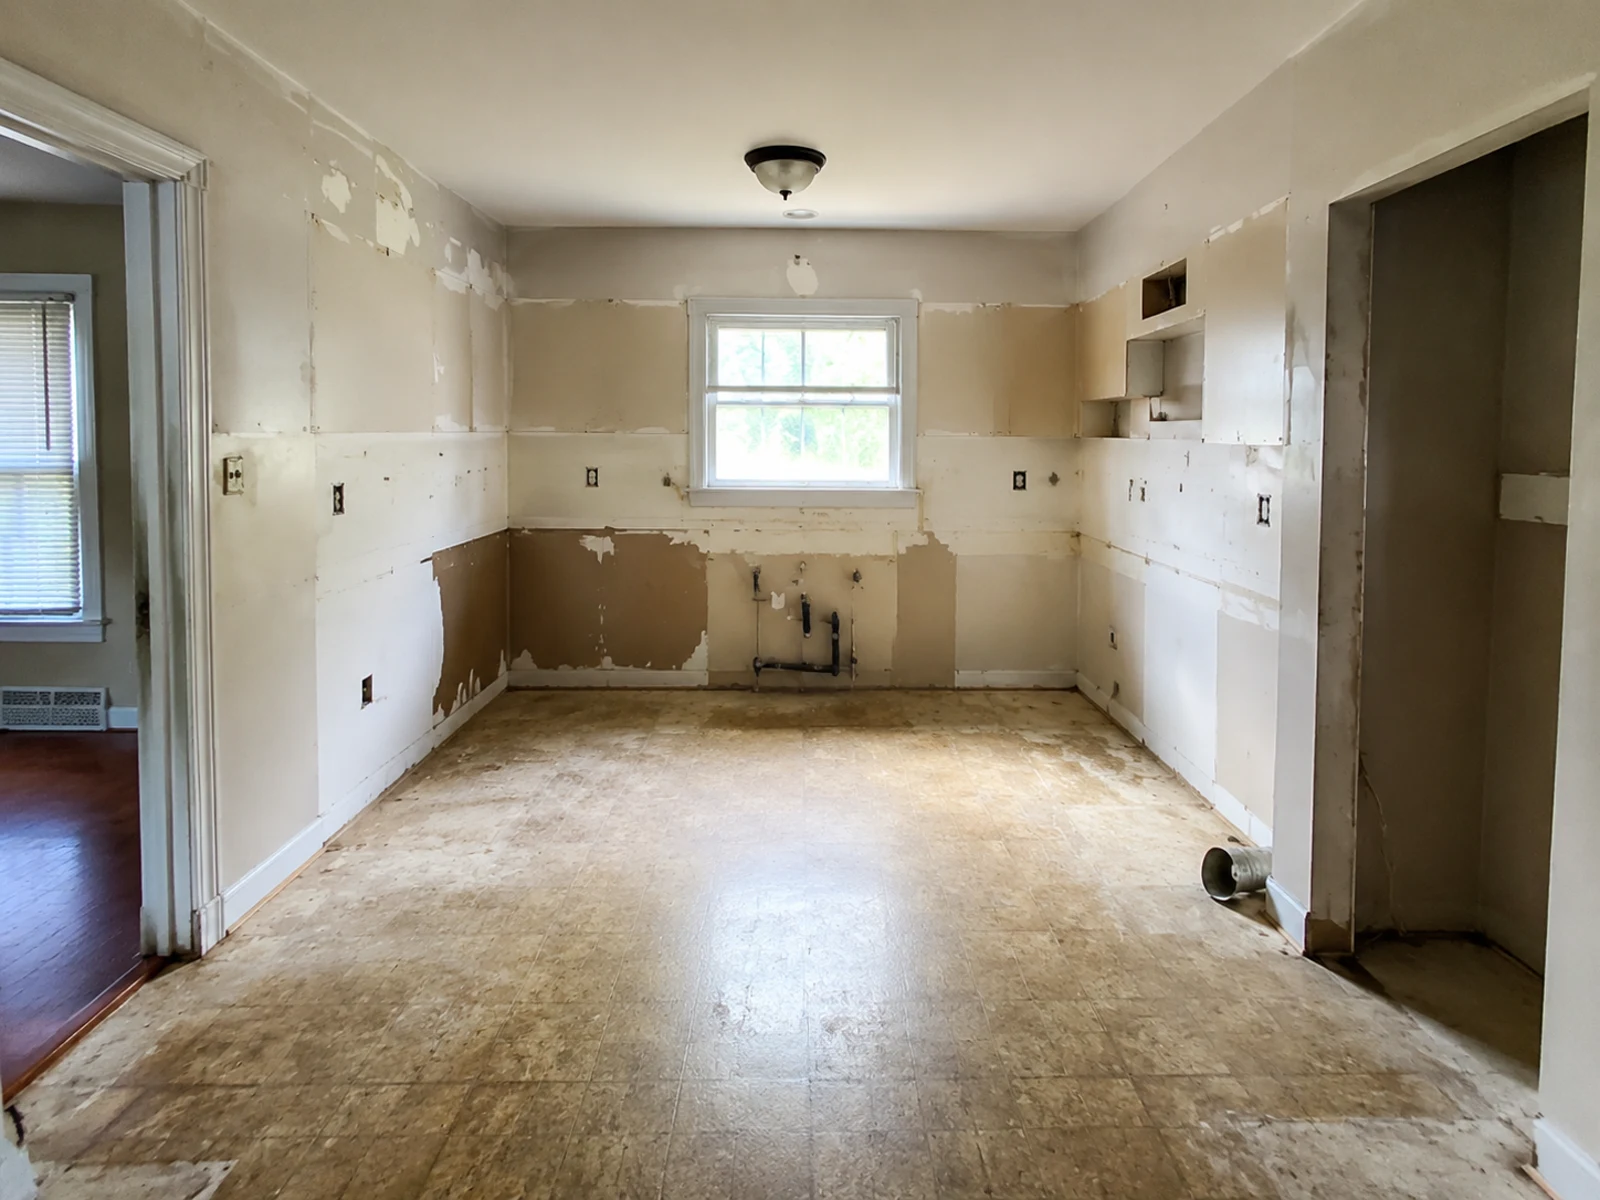
Existing room
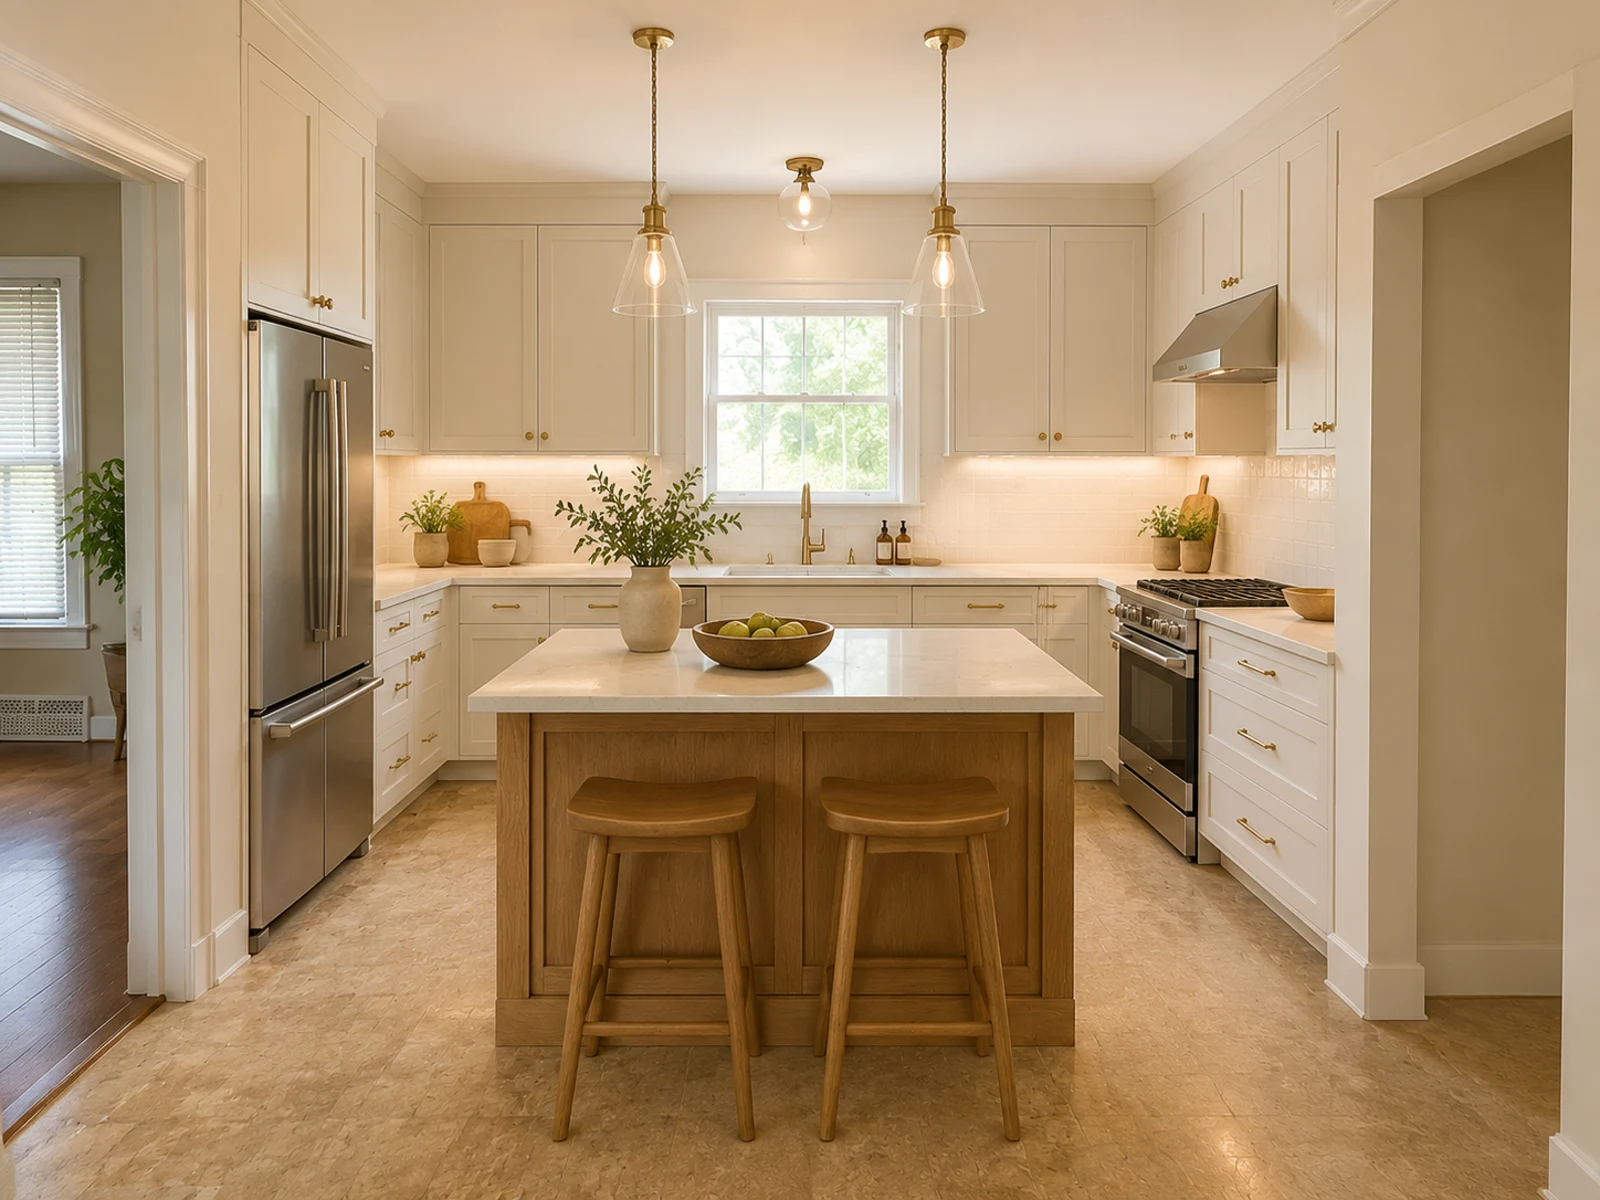
AI concept for visual comparison
The concept preserves the main room shape and openings, but every dimension, appliance position, and construction detail still needs to be verified.
Write a prompt that includes the room's limits:
Create a warm modern kitchen concept from this room photo.Keep the window, door openings, ceiling, floor, and main camera angle recognizable.Preserve the planned refrigerator, sink, range, and island positions.Explore warm white cabinets, light oak accents, a subtle stone countertop,simple hardware, and layered task lighting.Do not add or remove walls, openings, plumbing fixtures, or appliances.Use this image only for early visual comparison.
If the kitchen requirements are complete but still need structure, use the to organize the brief and prepare the visual prompt. When the brief is ready, use the to compare design ideas using a photo of your own kitchen. For the broader workflow covering source images, prompts, and result review, read .
DIY planning can work for a limited refresh with no layout or utility changes. Bring in qualified help when the project involves structural changes, relocated plumbing or gas lines, electrical work, ventilation, accessible design, or complex custom cabinets.
A kitchen designer can coordinate workflow, cabinets, storage, appliances, and finishes. An interior designer may plan the kitchen as part of a larger design for the surrounding rooms and finishes. A cabinet supplier can prepare and manufacture the cabinet system, but what they include in the job varies. A contractor plans construction and coordinates the trades. Confirm who will measure the room, prepare drawings, check appliances, and approve changes.
Do not let an attractive image move the project forward while a technical question remains unresolved.
Checkpoint
Approve only when
1. Brief
Users, priorities, scope, what must stay, and the budget range are clear
2. Layout
Measurements, appliance models, traffic, doors, and task zones have been tested
3. Technical review
Cabinets, utilities, ventilation, and lighting are coordinated, and required approvals are in place
4. Order
Final drawings, specifications, finishes, quantities, responsibilities, and lead times are approved
Decide first on items that take a long time to order or affect many later choices. These usually include the layout, major appliances, cabinets, countertop, ventilation, and plumbing locations. Decorative accessories can wait.
Start with a short brief, not a layout. Record who uses the kitchen, how they cook, what they store, what must stay, and the three problems the new design must solve. Then measure the room and confirm what cannot move.
The common layouts are one-wall, galley, L-shaped, U-shaped, peninsula, and island. An island is usually added to another layout rather than used alone. The best choice depends on room shape, openings, utilities, traffic, storage, and clearance.
Yes, as a quick check between the sink, refrigerator, and cooking appliance. It is not enough for kitchens with several cooks, separate ovens, large pantries, or many activity zones. Use task zones and traffic tests as well.
There is no single number for every project. Check current NKBA guidance, local code, accessibility requirements, appliance doors, seating, and traffic through the room. An earlier public NKBA guideline suggested at least 42 inches for one cook and 48 inches for multiple cooks. That edition cites the 2015 IRC, so do not treat those figures as confirmation of the current Fifth Edition.
Choose the exact major appliance models before final cabinet drawings. Their dimensions, openings, door swings, panels, connections, ventilation, and maintenance access affect the cabinets around them.
Only if the island has enough space and the plumbing or power, safety, ventilation, cleaning, and seating trade-offs make sense. An island used only for preparation is often simpler. Test splashes, hot pans, seating, ventilation routes, and open doors before deciding.
Not always for a simple finish refresh. Professional help is valuable when the project involves layout changes, custom cabinets, structural work, plumbing, gas, electrical work, ventilation, accessible design, or permits. Confirm who is responsible for measurements, technical checks, drawings, and approvals.
AI can suggest early design ideas and help compare materials or mood. It should not be trusted to verify dimensions, appliance fit, clearances, plumbing, electrical work, structure, code, or construction details. Use measured drawings and qualified review for those decisions.
There is no single timeline. Planning time depends on the scope, approvals, product lead times, and how quickly decisions are made. Do not rush to order until the measurements, appliance specifications, layout, and technical plans match. Spending a little more time before ordering usually costs less than correcting a problem during installation.
Upload a photo of your kitchen to the and compare a few early concepts. Use the option that best fits your brief to discuss colors, materials, and the overall look. Then verify every dimension and technical detail before ordering or building.
Related AI Design Guides
Continue with related AI design guides, prompts, and concept review.
ArchOne AI Team
Written by the ArchOne AI editorial team using kitchen planning guides, manufacturer documents, and real-world design practices.